This post is aaaaall about how I run my Math Workshop. Warning: it's a lot.
One element that I use
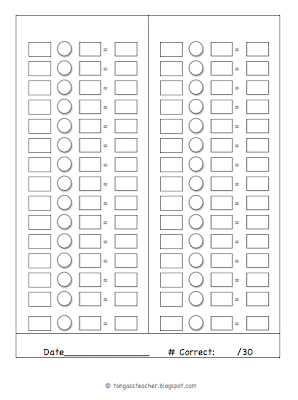
every day (and am a huge advocate of), is Roll and Write. Now, this may be a lengthy explanation, but stick with it. Here's how it works:
Materials:
Some teachers use lined paper (notebooks) for students to do their Roll and
Write, but I have come to prefer these packets that I made. I actually
like students to write in a lined notebook (is that crazy?), but for
some reason, this fits my brain better lately....The Roll and Write packet is stored in their Math Binder (1 inch). They open it to a new page, write the date, and wait for me to start the timer for 5 minutes.
You can snag the FREEBIE I made by clicking below.
The timer I use is PERFECT because a.) it is big enough to see from the back of the room, b.) it has a light to make it stand out, c.) it gives a 1 minute warning, d.) it visually counts down by the second, and e.) you can choose to have the audio (this one is a "beeper") or not. I bought it from
Kagan.
Students have a set of either
dot (the easiest because they can count the dots) or
digit (a little more advanced) FOAM dice, or for students working at a harder level, I have colored wood dice with 5-10 numbers or octa-dice with larger numbers. If a student isn't using the foam dice, they get a small square of felt to roll on (so that it is silent). You can also use a deck of cards for "Flip and Write" if you don't have dice or would just rather use cards (just separate 1-5 or 5-10 if you want them to be working within a certain range). Each student keeps their dice in their zipper pouch (in their binder). I have a tub that I store dice in so I can switch out quickly if need be.
Directions:
At the beginning of every year, I give explicit instructions on what Roll and Write should look/sound like. Students need to hold the dice in their hands, put their wrist down on their desk and open their palms. I've discovered there is no reason to roll or shake the dice (sometimes kids like to shake dice for 30 seconds...time wasting). After the dice are rolled, they ARE NOT ALLOWED TO TOUCH THEM. For some reason, I've noticed lots of kids (girls in particular), that like to adjust their dice and make them side by side or perfectly aligned so the number isn't upside down. Doing this each and every time adds up. I demonstrate why we don't roll dice, drop them from above, or waste time making them 'look pretty' (I make a show of it, dropping dice all over, acting silly...acting is such a big part of our job, isn't it?).

After students have mastered how to quickly roll their dice, I start the timer and students get to work. They roll and write, roll and write, roll and write. While they are working, I roam the room with a RED pen (I know, I know, I'm a terrible person). It could be a different color, as long as it isn't the same as what they are using. If I spot ANY mistakes (number reversals, digit reversals, incorrect answers, sloppy writing, etc.), I underline the mistake with my red pen and WALK AWAY. That part is really important. Students need to be able to identify their own mistakes, and I've learned that if I stay there right next to them, they tend to argue or get in a discussion of "what I meant to write was a ...." instead of just fixing the problem. As soon as I underline, students need to fix their mistakes. This is really important as I don't have time to look over each roll and write every day, and I don't want them practicing something incorrectly.

After the 5 minutes is up, the timer goes off and students get to finish the equation (and yes, that is the word we use) they are working on. Then, they count up all of the equations they were able to complete and write their total at the bottom of their page. Because I've assessed where they should be at (which dice, which type of equations), they should be working at their "just right level" (not just for books!). This means, they should be getting at least 15 problems done in the 5 minutes. If a student wasn't able to complete 15, I keep them in at recess and have them do it again for 5 minutes (I do this so that I can watch to see if it's something like they are wasting time adjusting or something else...usually it's just that they were off-task though). At this point, I've discovered students will sometimes cheat and start writing on a previous day's page to make it appear they have completed 30 that day. So, to combat that, I've added a "you must get the teacher's signature at the top of the page the same day you get 30/30" rule. That way, if they try to show me a 30/30 that isn't signed from a previous date, I know they were combining two days of work.
Motivation plays a big factor in a successful day of Roll and Write. I sometimes use Matthew Cando (get it? Math you can do!) as a motivator. I got him at a district training a few years ago and the kids LOVE him. He has a cute robot voice (my husband taught me well) and likes to sit on the desk of someone who had a CAN-DO attitude during Roll & Write.
We also have a discussion about "not announcing your score" and how they are competing against themselves rather than eachother. I want them to beat their best score and not worry about anyone else's. For the most part, this isn't a problem after the first day. On some occasions though, I have used competition to get a couple of boys who were unfocused to get the job done. Worked like a charm for them (sometimes people just need a lil competition!).
When a student completes 3 days (does not have to be consecutive) of 30/30, I move them on to the next thing on my Roll and Write checklist and write the date they started the new skill. I keep this list in a page protector on the whiteboard so that I have quick access to it.
And because I'm not always there to remind a student how to do the skill they are working on, I include this how-to page in their packet (it's also helpful for a guest teacher or a paraeducator working in your room, or a parent when you send a packet home).
Another element of balanced math that Nancy introduced me to was Drops in the Bucket. After students finish Roll & Write, they get out their Drops in the Bucket packets. Again, kept in their Math Binder.
Click below to check out their website and download sample pages.
The idea behind these worksheets is that they are REVIEW (not new learning) and students should be working INDEPENDENTLY. That means, if a student doesn't know how to do a problem, I do not use the packet to teach them. That
doesn't mean I don't help them with a minor issue they are stuck on, but if they are totally lost on a problem, I don't sit down right then and there to show them how to do it: they skip it. I will teach the concept later during a math minilesson or during Calendar time (this is a great way for me to see what things I need to add to my minilessons). Basically, this means I don't stand in front of my projector going through each problem with the whole class and using it to teach new skills/concepts. Each student works at their own pace, and at their own level. I use levels A, B, and C for just 2nd grade. I set the timer for another 5 minutes. While students work, I roam around with that red pen I was just using during Roll and Write. I underline or circle mistakes and walk away so they have to figure out what they did wrong right away. If a student reaches the bottom of the page before the 5 minute timer goes off, they TURN THE PAGE and keep working. When they finish their whole packet, they turn it in so I can have a thorough look at it. I correct any other mistakes I wasn't able to catch during my roaming, and write which page numbers they need to fix on the front of the packet. They might turn that packet in 2 more times before all of their corrections are done, but it doesn't ever go home with uncorrected mistakes in it! I personally like Drops in the Bucket because it has such an extensive selection of types of problems and I love that the different levels are really differentiated while the format stays the same. You could do this daily math review with Evan Moor or Minute Math as well though.

I store all of my Drops in the Bucket masters in binders for easier packet-copying. Each packet has the level and range on the front cover so I can quickly see what a student is working on.
It's also very important to do whole group fluency practice. This can be done in a variety of ways. The first way I want to talk about involves using a manipulative tool called a Rekenrek. If you've learned about subitizing, chances are you've seen a Rekenrek. This is a fantastic tool to use in addition to ten frames. If you don't already know what or how to use this tool for math instruction, I highly recommend that you READ THIS. If you don't have the funds to buy a fancy shmancy display Rekenrek or student versions, you can easily make your own.


I haven't used my Rekenreks for a while now, but plan on it this year. My 2nd graders this year will be needing the extra support and visual aid. Thankfully, I bought a great little curriculum set a few years ago that goes really well with the use of Rekenreks. It even comes with big books (these are my favorite part) that introduce the mathematical concept you are working on! This helps students visualize and put numbers to a context (like a story problem), which I have found is really important for these younger kiddos.
Before I bought this one, my husband made one (I gave it to a dear teacher friend though, so no photo for you!). I bought spray paint, wooden dowels, wooden balls and he used some scrap wood and his drill to make one. If you aren't inclined to do that sort of thing but are fortunate enough to have a crafty man in your life (or woman for that matter), show them what it looks like and see if they'd be willing to try! Don't forget the thank you beer muffin basket!
The second way I teach whole group fluency is with ten frames and a deck of jumbo display cards or ten frame cards. I keep one ten frame set for display above my Math Focus Wall, and another set is used as flash cards. You can find these in my Editable Chalkboard Decor Pack.
If you have a deck of cards or even index cards with numbers on them, you can practice whole group fluency. I found these at a local store.
While my kids are sitting on the floor, or are standing in line while we are waiting to go out the door, I flash a ten frame card. Depending on the skill we are working on, I could be asking them to tell me "the other part of ten, double or double plus one" (etc.). For instance, I hold up a 6, the class says "4" if we are practicing tens partners. Or I hold up a 7, the class says "14" if we are practicing doubles.
Nancy bestowed many different number lines upon me, but these are my favorite ones. I keep one on my dry erase board for whole group minilessons, and a class set in a ziploc bag for games time. I've added velcro to the student number lines so they will stick to the carpet when kids are playing math games, and magnet strips to my display number line so it will stick to my magnetic whiteboard.
Another important element in
any elementary (yes, 3-5 too!) math curriculum is Routines Time (aka Calendar Math). My district implemented Everyday Counts when we adopted Math in Focus last year, but I like to incorporate lots of other activities. I think it's important to remember that your wall space for math is just as critical as your ELA space...even if you don't like to teach it as much as you like to teach reading/writing (I know that's not
you though)! I divided my large bulletin board straight down the middle (one side is a word wall, the other side is my Math Focus Wall) and although most of it stays put all year, there are a few things that change as students learn the concepts and we move on to other things (i.e. CHANGE IT UP! If they have the months of the year down, don't need to sing the song every. single. day.).
I made sure my kids had 200s charts
on the back of their DEBs (
dry
erase
boards). I've done both laminating/taping and just using page protectors, but I have to say the laminated versions last a lot longer and don't fall off...currently, I'm having a parent volunteer help cut out new ones so I can laminate and tape them on to the whiteboards.
You can download my 0-200 Chart FREEBIE by clicking below. Please remember to "tip your server" (leave feedback) while you're there.
Right after we have Roll & Write and Drops in the Bucket, students put their binders away and bring their DEB and marker to the floor (I have assigned spots for Routines Time...those who need lots of support sit right up in front so I can keep them engaged). I used to cut erasers into thirds, but I found
these dry erase markers with erasers on the caps on Amazon two years ago and they. are. awesome. I convinced our school admin to purchase a bundle of them so that every classroom could have them. Seriously, if your students use dry erase markers and you haven't invested in a set like this, I highly recommend you do.
We talk about using DEB as a tool, not a toy (doodling is for special occasions only...like when I have an emergency and I need them to give me 5 minutes). This year, on a whim, I stuck these googly eyes I bought over the summer and a wig I had in my room to give her some personality! The kids LOVED it. I blamed all the rules on DEB...she's just so darn particular!

I write anywhere from 1-5 questions on the board (depending on how much time we have left/difficulty of the problems). The problems are usually finishing a pattern, adding coins, input/output (function) boxes, identifying shapes, fractions, and telling time. As students make their way to the floor they start working on the problems. I do this for a couple of reasons, but the main one is that I need something productive for my kids that get seated quickly. My kids that take a long time to put their binders away might get to the floor and only have time for 1 problem. My intention isn't for everyone to do each problem, so that doesn't matter. After only a few minutes everyone should be seated and working quietly. I begin Routines Time by showing how to find the answers to the problems on the whiteboard. Students don't get to change their answers or add anything, whiteboards remain on the floor in front of them. This is SO HARD for so many of them. But, eventually, they get over it. Also, I've decided against students showing me their answers on their DEB simply because I can see them from where I stand. Of course, I use what I see on their DEB to guide my instruction. This whole DEB process takes about 5 minutes total.
After DEBs, we move on to the
actual Routines Time. You might call this Calendar Math, but because it's so much more than teaching days of the week and months of the year, some teachers have learned to use the term, "Routines Time" instead. I move through a variety of things and keep a "perky pace" to the best of my ability. I only have 15 minutes, and I use every precious second of it. No time to tell me about the time your grandma took you to the zoo and blah blah blah. Sorry, maybe later when we're getting in line for recess. The main idea that I keep in mind for Routines, is that if the class understands a concept, make it more challenging. Don't just keep doing the same thing over and over. Remember to differentiate and keep them learning, not just reviewing. Of course, it's important to go back and make sure they remember the months of the year. But if all 23 have it, I don't need to do it every day. Maybe I change the question about months to be: What month comes after February? Or what is the 5th month? I'm constantly differentiating and changing the questions to fit the needs of my students.


My Lakeshore pocket chart came with a write on/wipe off hundreds chart,
but again, 1-100 isn't enough (plus...we need to teach "0" educational
companies...are you listening?!), so I got a write on/wipe off 1-200
display size chart (again, no zero). You can find one
here
for $15. I took a pair of scissors and (gasp!) cut the 10s from
the right side and moved them to the left side to line up with the zero I
had to add myself. A little highlighter tape to make the tens a little
more identifiable and we're in business.
Click below to download this FREEBIE! I
use the questions in these as guides for my instruction during
Routines Time, but I
don't stick to it like a script, so if you use
this, please make sure you are changing the numbers/questions for what
your kids need.
Teacher Instruction:
We begin each Chapter Lesson with a minilesson, but sometimes that minilesson is more of a major lesson (as in 20 minutes). Sometimes students have their textbooks out and are following along with me as I introduce a concept using my handy dandy teacher guide, but when following the chapter example problems isn't enough (they aren't
getting it), I use "number strings" (an idea I first learned about during the Saturday PD class). You can buy the Number Talks book that explains more about number strings (and even has sets for you to use before you become skilled at making your own sets)
here. The basic concept of number strings is that they are
purposeful sets of problems/equations that build upon one another and increase in difficulty/level of understanding. Once you get used to the idea, you can easily write your own number strings "on the fly" and adjust them while you are instructing based on how your students are responding. For example, if I was teaching double-digit addition and wanted students to learn another addition strategy, I might start off by writing 23+56 on the whiteboard. If my students can solve this equation, the next one might be 23+58. After listening to students explain their thinking (the importance of
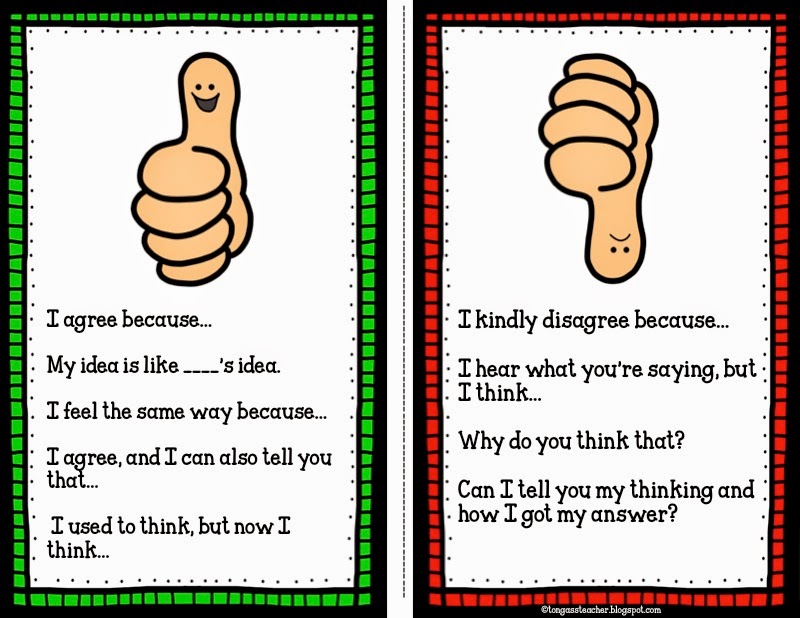
Math Talk cannot be stressed enough), you would know who was able to use which strategy and whether or not they are using an efficient strategy.
Are they noticing the pattern (2 more) from the equation we just did? Is anyone able to use the strategy "share some to make it friendly (take 2 from 23, making the equation 22+60)?" I would then decide if I should do a few more similar problems that students could try the concept I was trying to teach. I have anchor charts for each strategy that I keep up all year for students to refer to. I need to make individual sized ones (or just print these photos) for their binders, making a mental note to do that now. Here's one we are focusing on now.
On a little side note, Math in Focus comes with these fantastic, foam base 10 pieces, but the
ones pieces don't stay put (even with magnets), so I needed something that I wouldn't be fumbling around with that was big enough to model what I was teaching. So I whipped some up, printed on cardstock, and added magnets to the back.
Guided Practice:
The basic idea behind guided practice is that students are working through the problems
with you. I like my students to use spiral notebooks to work out the equations in the textbook. The best way I have found to manage this is to have students share a textbook between them. If I can't do that, I have showed them how to put their notebook on one
side of the textbook so they can fit everything on their desk. Life skills, check.
I spend a lot of time at the beginning of the year making sure they write the title/date, write
on the lines in a smaller size than most are used to, use the pink lines to guide starting and stopping points on the left and right, number their problems, box their answers...all that management stuff that I *hope* those intermediate teachers will appreciate later on. Working through a problem at a time, I slowly let go and check to see if students are able to do the problems with a partner or independently yet. This is where your teacher judgement comes in handy! Not getting it? More guided practice. Got it? Move to independent practice time.
Independent Practice:
There are 2 methods I use for Independent Practice. Before MIF, I would make up my own "sets" (A, B, and C) of equations for students at varying levels of ability. Students work independently to solve these problems and check their work with a partner when they are finished. Now, I can still use my own equations, but I often use the ones straight from the text or workbook. If partners get different answers, they are supposed to solve the equation together or prove why they think their answer is correct until they can agree on the answer. This is where having a good foundation of Math Talk is critical. Click below to download the FREEBIE! Your students can have it out when they are checking each other's work, while playing a math game, or you can use it as a poster for whole group time (I made it in 2 different skin tones, as well as black and white).
I have them initial the top of the page of their partner's journal/workbook to show they have checked it with a peer.
When they are finished, they work independently again to write a word problem using one of the equations they just solved (turning the "naked numbers" into problems with a context). I model this a lot and show students why I choose the names Bob and Sam (because they are easy to write). In the beginning of the year, I guide them toward using balls or toys (again, because they are easy to write and kids can think of those things in larger quantities) in their word problems. When they have written a word problem, I have them check their answers with a calculator. This also requires some preteaching about how to use a calculator, and then how to use a calculator appropriately.

While Independent Practice is happening, I am able to meet with a small group (think: Guided Reading). Most of the time, I can figure out who I will need to meet with during the Guided Practice time. The only real time I can predetermine who I am meeting with is right after a test. But, because MIF has pre/post test for chapters and I want to meet with students prior to those and more frequently, I make a mental list when checking for understanding during Guided Practice.
I've also done centers/math game rotations in the past, and I loved this format of Guided Math. I gave each student an accountability sheet with the week's centers, and they checked off which ones they completed after each day. Then, at the end of the week, they would write a small reflection. This would give them a chance to voice any concerns or problems I didn't notice while I was working with my groups.
I used this nifty pocket chart from Really Good Stuff as my rotation board,
but I made my own centers to go on the left. Basically, any skill we were working on, I turned it into a center. I printed mine and glued them onto black cardstock, and laminated them for durability.
I still use a few games at the beginning of the year (great for sub notes and those random times you need kids to be independently working). We go over "Math Talk" and these are put in binders and posted on the whiteboard (another FREEBIE!):
Here is a photo dump of some old anchor charts (I'll be making new ones this year and NOT laminating them) in case you're anchor chart hunting:
So, that pretty much sums up my math block! For
now anyway...


What an amazing post. I learned so much that my head is spinning with new ideas to use in math.
ReplyDeleteLOVE the many ideas you wrote about! So going to start the year with your Roll and Write to get their math fact fluency up and running after their summer off!
ReplyDeleteMoving to second this year from first and love the anchor charts and ideas that you posted. I an extremely worried as math is not my strong suit about teaching regrouping makes me almost have hives, haha. Thanks again.
ReplyDelete